GAMEIN5D - Bigger Inside
  • HOME
  • PROJECTS BLOG
  • GAMEIN5D 101
  • Kick starter
  • CONTACT
  • HOME
  • PROJECTS BLOG
  • GAMEIN5D 101
  • Kick starter
  • CONTACT

The projects

(GAMEIN5D in action)

28mm Ruined Abbey - Introduction

20/4/2018

0 Comments

 
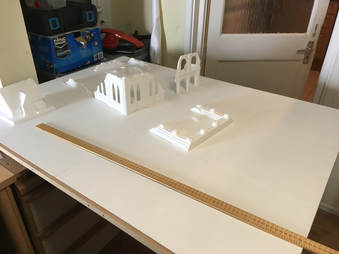
Getting the idea. I had some large, 28mm terrain elements already from Amera Plastics. Since they all had a vaguely Abbey-esque feel I was reminded of trips to Fountains Abbey which was this really cool ruined monastery which we used to visit when I was little. Who wouldn’t want to wage a futuristic galaxy-spanning war in a place like that?
It seemed like some larger ruined building elements with remnants of walls in a coherent design would make for a pretty cool layout – hopefully.
Picture
Starting somewhere. So here’s the starting point (image left) – a two W – board layout. I do prefer the W’s they are less versatile but I tend to stick to rectangular layouts anyway and the boxes are a bit more robust. That said the plan will be to add two A – style boxes eventually to make a full 6’ x 4’ layout. All the Amera elements are roughly assembled and placed on the
board and I start by shuffling them about trying to get a feel for where everything might go and what might be fun. The little cottage (F223) didn’t make the cut – maybe it’ll make the sequel. First impression was that I was going to need some additional elements (even 4’ x 3’ is a lot of space to fill), and as I wanted to try and do something with the foam packing I had left, this seemed like an opportunity to have a play around and scratch-build some ruined buildings. So with that in mind this “tutorial” (for want of a better word but it’s really just a description of what I did in approximately the order I did them) will now be split into 3 main parts:
  • Part 1: where I assemble and/or build the main ruined building elements.
  • Part 2: where (a) I decide on the locations of the main elements to the board and (b) start to build up some uneven terrain across the whole board and (c) procrastinate a lot.
  • Part 3: where I fix down the main elements and finish with paint, scatter materials and flock.
There’ll be overlap of Parts 1 – 3 and as I’m a numpty I didn’t take pictures of every stage so forgive me if there are some serious (though probably not as bad as The Last Stand) continuity issues with the pictures (go to Part 1).

0 Comments


Leave a Reply.

    Picture

    Hello, I'm Jon. 

    I'm very much a learner model maker, especially dioramas, gaming surfaces, models and toy boxes for me and my children.

    I also invented the GAMEIN5D base boarding system which I'm trying to develop into something more.

    Archives

    March 2019
    January 2019
    December 2018
    April 2018
    January 2017
    December 2016
    November 2016
    October 2016
    September 2016
    August 2016

    Categories

    All
    28mm Lava Terrain
    28mm Ruined Abbey
    Bases For Miniatures
    Dioramas
    Etc.
    Hello
    North Africa 1
    North Africa 2
    Paint
    Tanks
    Tools
    Z230 Redoubt

    RSS Feed

Powered by Create your own unique website with customizable templates.