GAMEIN5D - Bigger Inside
  • HOME
  • PROJECTS BLOG
  • GAMEIN5D 101
  • Kick starter
  • CONTACT
  • HOME
  • PROJECTS BLOG
  • GAMEIN5D 101
  • Kick starter
  • CONTACT

The projects

(GAMEIN5D in action)

Walls are hard

30/9/2016

0 Comments

 
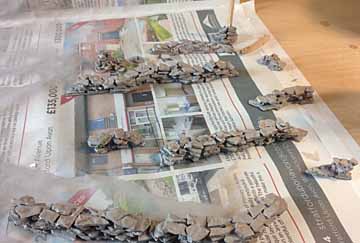
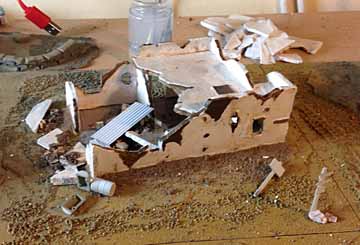
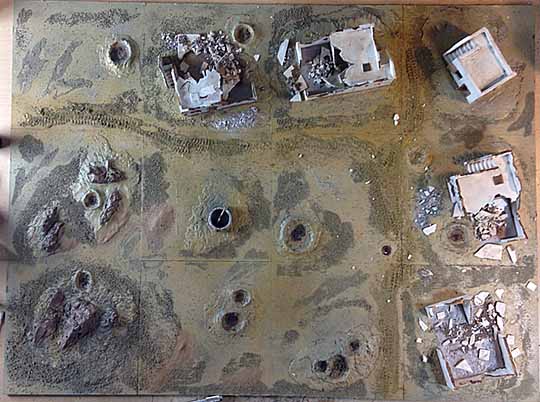
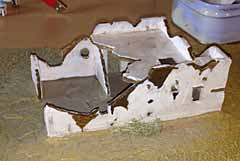
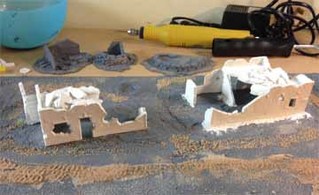
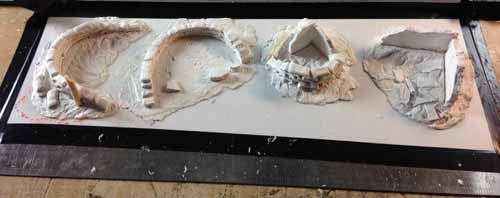
I think I will start at the end on this post. Below is the complete wall sections that I decided I needed. They are the end result of much failed experimentation and possibly the invention of some new swear words. The walls are not stuck down yet, just put in about the right place. I've no idea how everyone else builds walls but this is how I did it.
Picture
Fairly decisive failure to begin with - too much glue too early. Actually, this is well down the list of failures but pictures of me getting cross with Italeri's wall sections or getting covered in glue probably don't make for great blog posts (I may be wrong, I believe I have established my lack of expertise in these matters).
Picture
Picture
But I kept trying, there was something quite compulsive about trying to build a dry stone wall in miniature.
In the end; the method I settled on was the following. I don't for a second suggest anyone else should try this - there must be a better way. Or something on the TV.
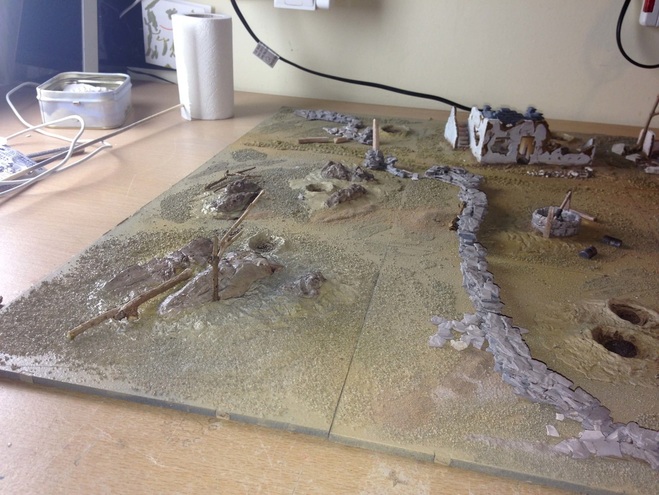
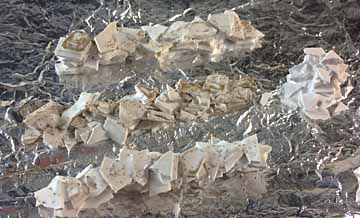
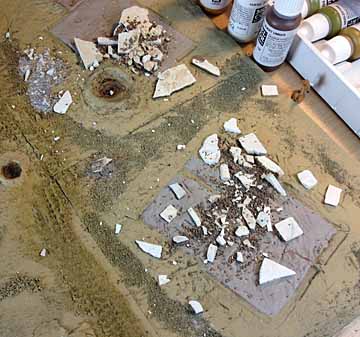
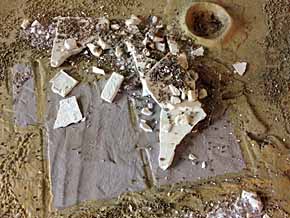
First I spread out a plaster mix about 2mm thick across a decent sized piece of kitchen foil. Once it's was dry I bashed it up, while it was tempting to unleash all that middle-aged angst and immolate it, I tried to be careful. I wanted pieces between 5 - 10mm. The foil puts a nice texture on one side which I put on top. Then the "fun" bit. I built small sections of wall on pieces of flat foil, and tried to make the pieces overlap. Like I said, quite fun really, which probably says far too much about me. And it amused my wife, who I suspect, after deciding it wasn't quite the final straw, filed it in the "future grounds for divorce" folder. 
On the last layer of wall I tried to use smaller pieces and lay them side-by -side to it looked like the wall was in two courses.
​Once the wall was built I dripped watered down PVA all over it. Again using a long needle nozzle to make sure every surface was wetted with glue. Once dry the foil peels off the bottom (mostly) and the walls are fairly robust.
Picture
Picture
I built various sections, different lengths and heights as I want some parts to be falling down. I also built some wall end sections which I want to put posts into. They got a spray with grey primer first and then I hand painted them with Golem Smeg. But they'll need more painting.
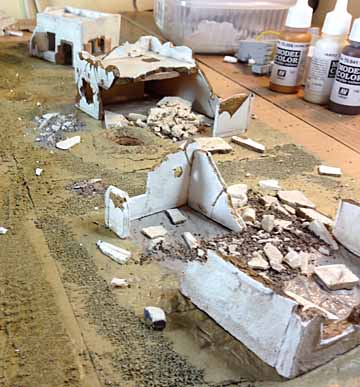
Then I plonked them on the base and took the photo. In between waiting for paint and plaster to dry I've also carried on painting the minor items, you can see some barrels, etc. on the big photo at the top too. And the privet's out of the oven, nicely dried out.
0 Comments

Minding the gaps and details

26/9/2016

0 Comments

 
Much like me, if I stay in place too long, buildings in the desert accumulate a good build up of rubbish around the edges. Also a bit of stuff around the bases of the buildings will allow the hiding of any remaining gaps, or anything else I don't like the look of. I applied a PVA + water solution (40/60ish) along the edges of the buildings with a needle nozzle so it doesn't slosh everywhere.
Picture
Picture
Then I sprinkled the remains of the finer bits of of ballast and sand left over from the rubble-isation (I can event words if I want to). It helped to blow gently towards the buildings so that the material built up in the right places. Then just repeat, I tried to use slightly finer particles towards the end. I think it worked better above, but not so good on the left. On the left I used too coarse a material - not for the first time.
Once dry, I wash over several times with the brush water, sometimes taking a bit out and darkening it if I run out of patience with how long it's taking. I've also started thinking about a few minor pieces, road signs, barrels and boxes, minor trash left lying around.
The sand bags are living dangerously. Little pieces of evil that are a nightmare to trim, don't stack and were clearly created with the sole purpose of making life difficult.
Picture
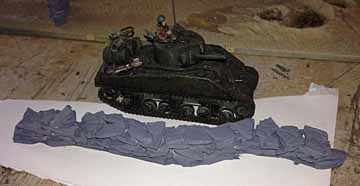
I've seen some awesome sand-bags created by other modelers, but for me they are definitely a work in progress. Also, I think the whole thing needs walls. Maybe walls will be easier than sand-bags.
0 Comments

I can see the pub from here

25/9/2016

0 Comments

 
Well, maybe not the pub, but possibly the end of this project. On a side note, I have actually been to the pub from the XXXX advert, it's in Oz, it's very cool and has (well had 14 years ago) a car from Mad Max 2 parked outside. I spent two weeks out there once (field work, not in the pub) and brought my wife (then fiancee) a stubby (beer bottle) holder, themed shot glass and a fridge magnet back as gifts (from a major silver mining region). And she still married me, bless her.
I took the plunge and glued the buildings down. They've had various washes with Agrax Earthshade over the browns and in some of the cracks and several washes of the water from the brush pot which sounds terrible but gives a really good dusty/dirty look to the surfaces with the same pigments I've used for the base and the buildings. So they look a little better.
I'm still working on the surface colours too but now I've got the buildings down it will force me to be more careful and think about whether I need to keep adding colour. Or I'll be here forever.
Picture
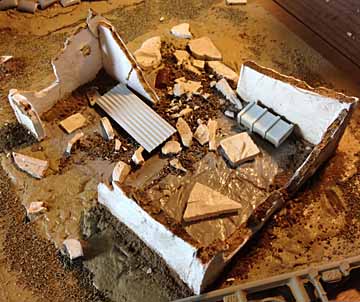
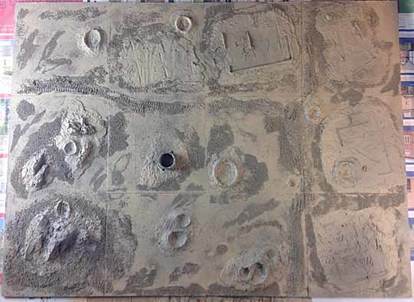
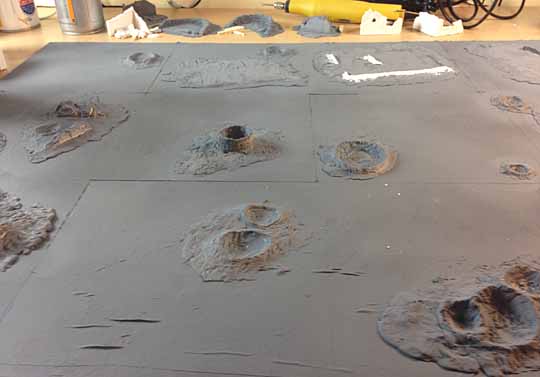
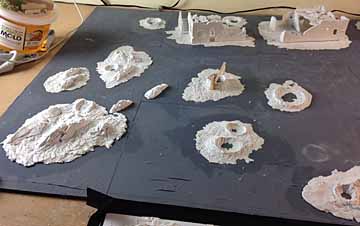
Also, any surfaces I think are too shiny or uniform have had a few wash coats to "knock back" the shine and produce some variation.
So, this "aerial" shot, again produced in partnership with being too short and teaching your children some new swear words because you didn't know they were in ear-shot, shows where I am now 
I'm still not happy with the surface colour in places, too orangey/green and the buildings need to be "blended in" to their surroundings. That means (for me) adding textures to the edges of the buildings so there are no gaps and they look like dust and sand has accumulated around the edges.
Picture
I also need to start thinking about finishing up with accessories, some sparse vegetation, scrubby trees, some discarded equipment and a couple of road signs I think. For the trees I've got some bits of privet drying out in the oven, that's not a phrase I've used before, it'd make a great euphemism for something - "I'm just drying out me privet in the oven".
0 Comments

Conservation of mass: Ruin + rubble = ?

24/9/2016

0 Comments

 
So when a building becomes a ruin, all the blown up stuff doesn't just get vapourised, we're talking explosives not phasers. So for my ruined buildings I've used all the waste pieces, fragments and broken chunks. I even cast a couple of extra building parts in plaster then broke them up. All these extra broken pieces need to make up the missing parts of the ruins.
Picture
Picture
Of course, that also means painting all the rubble as well because that's a lot of exposed broken brick work. It's just a tiny bit possible that I assumed that the white plaster on the walls of these houses was pretty damn resilient and mostly survived the shelling and stayed plaster-white.
I also added a load of course balast mixed with fine and medium and some sand. This all went in a tub with the brown paint mix and got a good stir. I left that to dry and then broke it all up and mixed some of the finer white plaster fragments back in.
All this created a reasonably convincing (from a distance, one eye closed) collection of rubble which I laid out across the building bases. Spent far too long "gardening" this stuff but it seemed fairly important to get right. In most of these ruins the roofs come down, that's a lot of rubble. I so want to make a Flintstone's joke now, but I will remain strong.
Picture
The big pieces were glued in with PVA and superglue, depending on how fricking awkward it was, then I followed that up with a misting of PVA + water for the finer stuff, then spent the rest of the evening prising my superglued fingers apart.
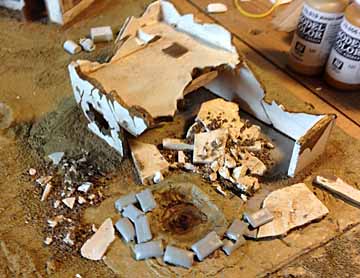
I'm still painting too, experimenting with what looks terrible mostly. Nuln oil wash in the craters is way too dark, as you can see above. So now I've got to lighten that up. But I'm still moving forward. 
0 Comments

Painting the buildings

17/9/2016

0 Comments

 
I finally got stuck in and painted the buildings, after all the putting-it-off it went quite quickly, quickly, not necessarily well. I need a lot of practice at this. The problem is, when you try to paint several things at once, you make the same mistakes on all of them.  
Still, living and learning and all that. Here's one of the buildings. It's had a coat of white primer, followed by a coat of Model Air off-white. Then a mix of several brown's and ochres applied to where the plaster has broken off the wall or the interior parts of the wall are otherwise revealed. There's a lot of broken surfaces on a ruined building. I didn't mix the browns really thoroughly, that way I get some variation in tones. 
Picture
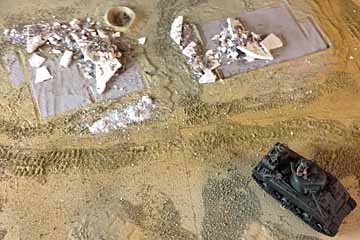
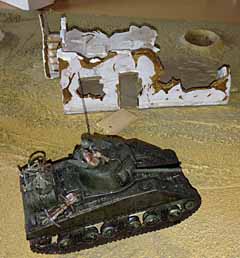
I hope you like my Sherman, it's from the Airfix Battlefront kit which is yet another from the started-but-not-going-to-be-finished-anytime-soon pile. I'll be using the Sherman for scale a bit. When I remember
Picture
Some of these buildings are made in clay, others are made in plaster of paris. The fine details are way better in plaster so one a couple I've tried to paint on the rough brick work. It's too small to photo, it looks awesome though - honest, not at all like it was painted by a monkey sat on a washing machine at full spin.
I've also painted the bases inside the houses. A mix of dheneb stone with a bit of brown variation. It's not called dheneb anymore of course, probably "Golem smeg" or something similar. But it's still early days for these, probably going to keep working on them and building up some very thin washes while I wait for other bit's to dry.
Picture
At the same time as I was murdering the buildings with paint, I was also doing a similarly outstanding job of building up the colour of the base. On a whim I'd bought a can of GOLD NC acrylic "sand". I planned to pick out the road and some of the features - to me they look an unpleasant sickly orangey-greenish colour - not very desert like. It took ages to dry as well - must resist World of Tanks.
Picture
0 Comments

What a difference a spray makes.

17/9/2016

0 Comments

 
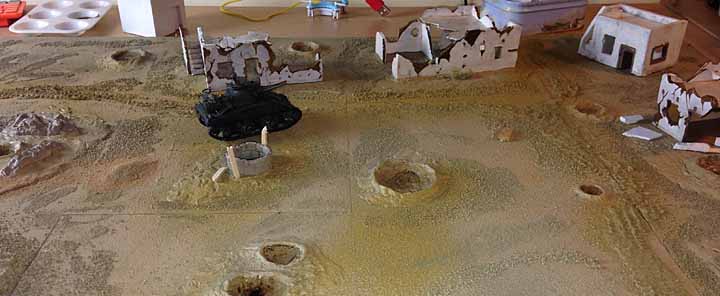
Sprayed everything with matte khaki (Halford's again) I've used this before and don't remember it being so greenish, but me and colour don't always see eye to eye. That said, things look a lot better when everything is a (slightly) more appropriate colour.
Picture
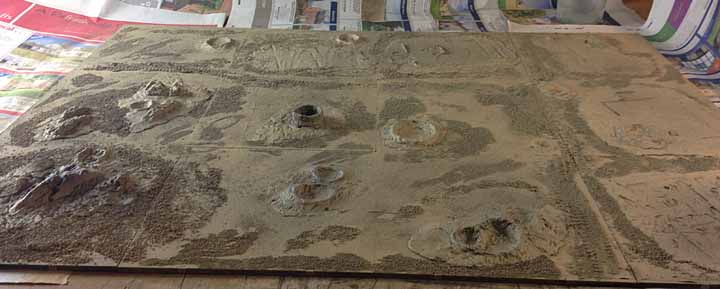
It also occurred to me to take an "aerial" shot, which was a bit hit and miss, because I'm quite short, but eventually (after filling my phone with rubbish pictures and quite a lot of swearing) I got this, which was ok.
I'm not convinced by some of the flat areas, they need breaking up. Also, I need to paint the floors of the buildings a different colour. Other than that I just need to start improving the colour, getting in some variation, shading, etc, oh, and painting the buildings.
Picture
0 Comments

Matthew's birthday

11/9/2016

0 Comments

 
Big North African diorama number 1 was where this all started, as a present for my eldest. I've always wanted to make another for my youngest so I was trying to get this done for his birthday. Which was this week.
Picture
It still will end up being his, as will all of my possessions, money, hopes, dreams, etc. Only kidding, I have no money. But clearly it's not finished. He'll have to settle for some LEGO for now and dinner out with the family. I should point out that this photo may have been slightly altered. We actually went out for fish n' chips, not some tropical paradise.
Unfortunately in the background of the original were two seriously grumpy looking old fella's, remember those weird bird-things in The Dark Crystal, like that but in tweed.
0 Comments

Paint, tweaks and texturing

10/9/2016

0 Comments

 
All the elements are glued in place now. I may have procrastinated just a little (a lot) about where everything went but the good thing about gluing everything down is that after a while the decision is made for you and you're stuck with it (Dad joke, I'm so sorry). Sprayed everything over again with grey primer. The Halford's one's have a quite rough matte texture which I like. 
Picture
Picture
The unpainted white bits are where I've had to correct for shrinkage of a base by adding a little extra modelling clay.
The photo on the left's a bit ropey (I refuse to spell ropey without an "e" spell-checker) but I've kept it because it shows the imprint of the walls on the bases. 
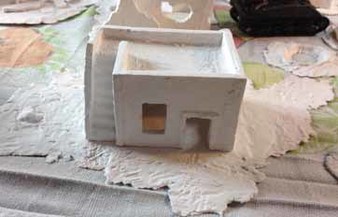
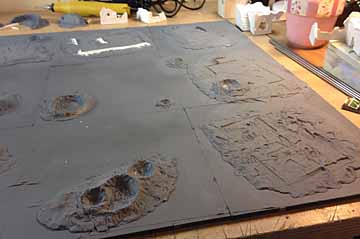
Surprising; they didn't shrink that badly, I think, because I left the buildings in the bases while they dried, even in the oven. ​I got a bit carried away next, it's not easy to remember to keep stopping to take photos. Before I knew it I'd spread PVA all over bits of the board and was adding ballast (medium and fine) and some kiln dried sand I had left over from constructing a patio, badly.
I've also put the buildings back in temporarily. The job of painting all those pieces is looming like a big, black loomy thing. I did have fun making the road. A couple of intermediate LEGO cogs on an axle, a smear of sand in a vague road like shape, back an forth with the cogs and a road/track appears. 
Picture
 A road complete with something that passes for vehicle (I was going for tank,but let's stick with vehicle) tracks are created, as long as you don't look too closely...

So here's some close ups.
Picture
Picture
Next up, I probably need to get some more paint on these, somehow I've come to believe that multiple layers of paint make things better. Maybe they just hide the errors, who knows? I do still have to paint all those buildings though.
0 Comments

Getting stuck in (well, down anyway)

4/9/2016

0 Comments

 
Picture
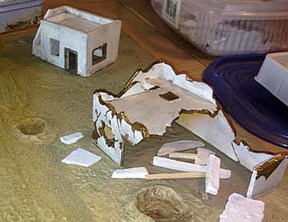
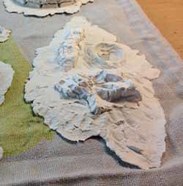
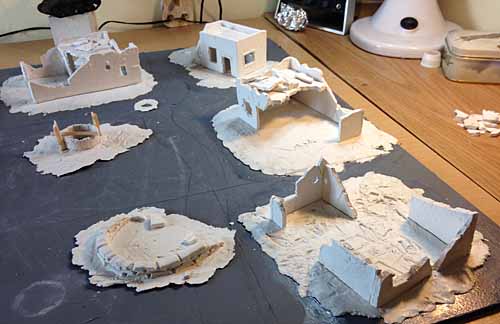
Things will start to take shape now as I am sticking some of the main elements down. I guess this means this is going to be more of a fixed diorama rather than a gaming board - not that my children will mind. I've finished a few other elements. I had a load of plaster - cast rock out crops and boulders so I've included a few elements with them to increase the topography. 

Picture
Also I keep making these jeffin' rocks whenever I have any spare plaster and I never use them. Here's one on the left, more modelling clay, rocks stuck in and another crater for good measure.
I've tried to line up all the rocky elements along a definite trend. All those years as a geologist are finally paying off.
Finally, something that looks like something. This was a first, test layout. I'm just trying to get a feel for how things relate to one another. Looking at photos from the web, buildings tend to all be built in a similar direction, and quite close together, so I'll stick with that idea.
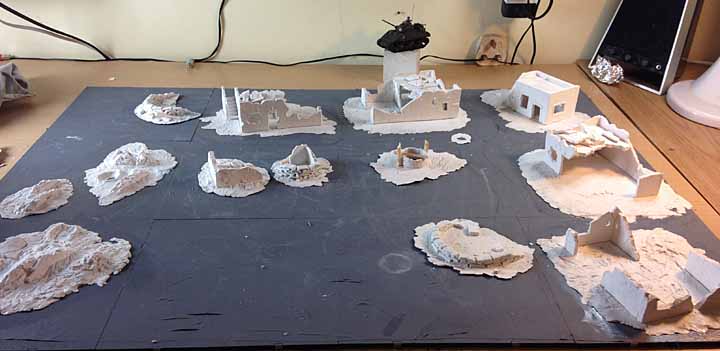
Picture
Let the gluing commence. Before one million different ways of laying this out are explored; I'm going to nail the damn things down or I won't get anywhere. The gluing is easy. Put a tonne of wood glue on the base and smear it out smoothly, slap it on the base board and keep pressing it down until it surrenders and stops curling at the edges. Resistance is futile!
Picture
Picture
Picture
 Here you can see the dark shadows around all the elements. That's a wide smear of glue as it squeezes out from under the edges.
Also, it appears that resistance is not entirely futile. A few of the elements, like the sand bag emplacements don't seem to fit with the layout and they're too curled up. I'm going to keep these as mobile pieces but they'll need flattening out.
Here they are, glued to a piece of plasticard that's taped very flat to my desk. The glue seems to soften the clay a little and it all gets pull flat, and then dries flat - in theory.
0 Comments
    Picture

    Hello, I'm Jon. 

    I'm very much a learner model maker, especially dioramas, gaming surfaces, models and toy boxes for me and my children.

    I also invented the GAMEIN5D base boarding system which I'm trying to develop into something more.

    Archives

    March 2019
    January 2019
    December 2018
    April 2018
    January 2017
    December 2016
    November 2016
    October 2016
    September 2016
    August 2016

    Categories

    All
    28mm Lava Terrain
    28mm Ruined Abbey
    Bases For Miniatures
    Dioramas
    Etc.
    Hello
    North Africa 1
    North Africa 2
    Paint
    Tanks
    Tools
    Z230 Redoubt

    RSS Feed

Powered by Create your own unique website with customizable templates.